Saturday, October 10, 2015

A Brand New, Scary Piano Solo Just in Time for Halloween . . .


I know it is a little late to be writing a new piece for Halloween, but "Macabre Incantation" is really appropriate to the season. Not sure exactly where the inspiration came from (and at least one student seemed a little concerned that I was able to think of music as dark as this, which is sort of amusing), but I ended up with a six-page piano solo that is approximately 3'40" in duration. I recommend it for any early-advanced or very late-intermediate student. Despite the six pages, I think it will be possible for motivated students to learn this piece in a week or two, assuming regular, focused practice.

The opening has a pedal effect that I don't think I've seen before, at least in student repertoire - but I cold be wrong! Point me in the right direction if you know of other pieces with this effect. I'd love a better way of explaining it on the score. So. In order to evoke the sound of a chamber door opening (or some similarly spooky place), I pressed the damper pedal down silently, and then very quickly released it and pressed it back down. The dampers strike the strings and make an eerie sound that is a little difficult to pick up on the recording, but if you listen for it, it is there! The looks on the faces of my students when they first heard this piece were priceless...the pedal effect works.


The pedal effect is followed by a quick chromatic run from D up to G#, and then the clock strikes three (a.m., presumably), as indicated by the repeated tri-tones. The first theme is a rather dark incantation...with the right hand crossing over the left to play in the lowest octave of the piano against the left-hand accompaniment. Much of the rest of the piece is based on patterns; tri-tones in alternating hands, fully-diminished seventh chords and other arpeggiated patterns that are simple to play, but will require a fast technique, finesse, and control in order to sound sufficiently spooky (how's that for alliteration??). The piece begins to close with another chromatic run and the clock striking four...and then after a pause to let the sound fade a bit, ends with a rather ferocious growl:


The sheet music for "Macabre Incantation" is available on my publications website at: publications.pianolex.com/macabre-incantation (single as well as studio licenses) and also at Sheet Music Plus (single license).

Listen to "Macabre Incantation" below. While you're there, consider subscribing to my YouTube Channel. I'll be posting all my compositions there as I get time. Please leave me a comment if you or your student is learning this piece. I'd love to hear from you!


Wednesday, July 9, 2014

Pianos and Cupcake Machines

At the age of three or four, my son's imagination was spinning with tales of an imaginary cupcake factory filled with chutes and conveyor belts, ovens and giant frosting tubes. He drew pictures of these machines and mimed working in his imaginary factory on a daily basis. It was a little exhausting, but so amazing and sweet, too. I miss those days, and if I can find one of those pictures I will post it.

I decided to write a little piano piece about those cupcake machines:
 

It's very short, but a lot of fun to play. Here is the first page of the sheet music:


You can't see it on this page, but did you hear the factory sounds in the SoundCloud recording? That little bit of dissonance is what makes this piece so fun, and sort of machine-like in that "Uh-oh, the cupcakes are piling up and falling off the side of the conveyor belt and the frosting has gone awry," kind of way. I am sure students will come up with some very imaginative ideas here. If the left hand part seems too challenging for the student, try turning it into a teacher-student duet and let the student play the right hand only, or double it at the octave. This leads to another idea...

What if you have two beginning students who love love love chocolate cupcakes? Why, you have them learn a cupcake duet, of course. I was inspired this spring to write a duet version of "Chocolate Cupcake Machine." (So far there are no recordings of the duet, but it is very nearly identical to the solo, only with the melody doubled.) 

Here's a preview of the first page of each part:


There's a short introduction that is sure to inspire giggles. Good for practicing counting aloud! You'll notice that both the Primo and Secondo are a bit easier for the student in the duet than in the solo. The Primo can be played as written or without the left hand. You might even turn this into a trio, having two students play the Primo part either one or two octaves apart. I highly encourage students to incorporate their own ideas into these pieces, by improvising on the note patterns, changing tempo (accelerando during the intro and ritardando to the end?) experimenting with different dynamics, or even adding to the melody. Consider adding instruments to enhance the cupcake machine sound. You could try this with either the solo or duet.

How would you use this piece in your teaching studio? Let me know in the comments, and also tell me if you'd like a complimentary copy of either the solo or duet (or both!). After you comment, please use the contact form in the sidebar on the right to tell me the email address you want me to use to send your PDF of the music. That way I'll know how to get it to you. 

If you want to purchase these pieces, visit my website at http://www.pianolex.com/sheet-music.

Tuesday, September 27, 2011

It's Finally Fall!

Now that fall lessons are in full-swing, I want to share a few things that are new in my studio, or not-so-new that might be of interest. Are you doing something similar in your teaching studio?


  • MIDI: Musical Instrument Digital Interface, or as we call it here, "the band." Most of my students have at least one book or piece that comes with MIDI accompaniment. We have our Yamaha YPG-225 set up next to the piano, and connected to an old laptop used just for MIDI applications. For technical exercises that have MIDI accompaniments available, we can adjust the tempo and key, remove or add voices to the band... and my students LOVE it. It is great motivation. I just have to say, "If you will practice this, then next week you can play it WITH THE BAND...." and they DO.
  • Time to start our annual Scales Challenge! I created a half-sheet scales chart with all the keys listed, and a small box big enough for a chart sticker above each key. I help my students determine what their individual challenge should be for scales, and we write out the goals on the back of the chart. For beginners, this is usually something along the lines of  "Play the pentascale up and down three times, then the broken chord up and down once, then a cross-over arpeggio (I call them harp songs for the littlest students)." For older students, we use the scale requirements for Guild or The Achievement Program (TAP, formerly the National Music Certificate Program through RCM), or I just come up with a challenging way to prepare the scales. We work on the charts throughout the year and if students choose to, they can post their charts on the wall of the studio. Here is the chart (two to a page, so you'll need a paper cutter):


  • Liszt Liszt Liszt! Our composer of the year is Liszt, in honor of the 200th anniversary of his birth. We announced this at the spring 2011 recital, and each participant received a small Liszt figurine as a recital award. Many of my students are studying pieces by Liszt or arrangements and simplifications. They will perform these pieces at our fall recital in November. We will have Liszt projects to complete at the upcoming performance workshops (aka "piano parties"). I'll post about this again later.

I have other studio programs to share, but this is all I have time for right now. Please leave me a comment or question below. Hope you are having a great first week of Autumn!

Monday, October 4, 2010

Free Printable Materials for Piano Teachers

Thinking it would be convenient to have all my printable materials in one place to share with other teachers, I set up my own "box" at box.net, a site for free file-sharing. Thank you to John B. whose Free Piano Teaching Materials site inspired me to get a box.net account.

Here are my shared files:


This widget will be automatically updated with new files as they are added. Maybe someday I will have time to categorize everything into separate folders. For now, everything is all together -- goal sheets, scale charts, keyboard diagrams -- at least the files are sorted alphabetically.

Let me know if you have questions or comments -- maybe you have a great idea for using the key/staff file or the scale diagrams. If you have your own materials to share, feel free to add your link in the comments, too.

Tuesday, June 22, 2010

One Simple Way to Manage Summer Lesson Schedules

Summer scheduling in my studio can be more than a little chaotic, with camps, family trips, and other activities making it difficult to maintain a regular weekly routine. I teach a total of seven weeks over the summer, and allow my students quite a bit of flexibility in scheduling, provided at least some of them can attend lessons during "school hours."

This year, I am trying something different by setting up my studio's Music Teachers Helper (MTH) calendar to allow students to select and register for their lesson times from their MTH home page, without having to call or send me a message. Here's how this "self-scheduling" method works for both the teacher and the student. Click on a screen image if you want to view it in more detail.

Part 1 - for Teachers Using MTH:

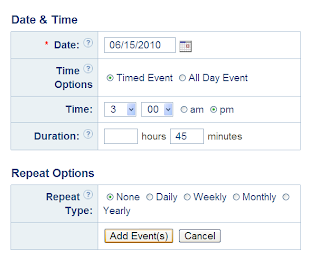
From the calendar, open a new event by clicking on the day/time you want to schedule the lesson. This brings up the screen below. You'll need to select the following options to make this work:
  • At the top, select the radio button next to "For All Students"
  • In the Online Booking section, select "Require students to register to attend this event"
  • Maximum Students: 1 (of course, you can set this to however many students you wish to attend. For my purposes, I chose to allow only one, because these are private lessons).
It should look like this:


From here, you have more choices. The title of the event should be distinct enough that it will stand out as an open lesson time. On my calendar I have the event title set as "OPEN" with a brief description:


Set the specific date and time just as you would any regular lesson or studio event:


Clicking "Add Event(s)" should bring you to the following screen. You'll see that the event has an open book icon. This is a quick way for you and your students to see that it is an "open" event and that they can register for it:


After a student (or however many students you have set as a maximum number) registers for this event, the icon will be a closed book, indicating that it is no longer available to other students. Music Teachers Helper will send an automated e-mail notifying that a student has registered. 

Part 2 - for Students and Parents:

If you are a student or parent of a student, the screen image below will appear when you first log in to your MTH page. In this example, I'm logged in as a student who has no upcoming lesson, although there are several open lesson times:


The open events will be easier to view from the calendar. You can click on "calendar" at the top of the page. Viewing the calendar in "week" format will look like this:


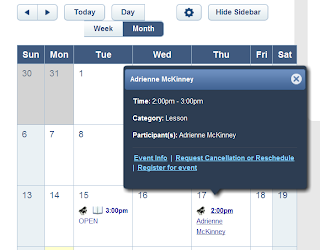
Selecting one of these events will bring up a smaller box with more details (see the image below). Click on "register for this event" if you would like to have this lesson time.


You will see the screen below, where you can enter any questions or comments for your teacher. 


Simply click on "Submit request" and you will have successfully registered for the lesson. The website will send your teacher an automated e-mail saying that you have signed up for that lesson time. The calendar icon will be a closed book, and only you and your teacher will be able to view the event.

If you are rescheduling a lesson that is already on the calendar, you may also cancel that original
lesson very easily. Clicking on your original lesson in the calendar will bring up this little box:


Select "Request cancellation or reschedule" and you will see the following screen to confirm your request. Enter comments if you'd like, and click "Submit request":


Your teacher will receive another automated e-mail that you have canceled the original lesson, and the message will include any notes you typed into the comment box.

That's it! It really is so simple, and you will be able to schedule and reschedule lessons whenever it is convenient. 

I am looking forward to using this lesson booking process in my studio. If it works as well as I think it will this summer, then it will save time for me and for my students and their parents -- fewer phone calls and e-mails all around. How can you beat that? 

***

Are you a teacher who has ideas for managing lesson schedules? Do you use MTH to help keep your studio organized? Do you use a different method for scheduling during the summer versus the rest of the year? Please share by adding your comment.

For more information on using the Music Teachers Helper website, I encourage you to read the MTH blog.

Thursday, February 11, 2010

Google Wave for the Independent Music Teacher?

I've found a way to embed Wave into my studio site as a way for my students to share videos, practice ideas, and questions for me and for other students. I have no idea if my students and their parents will use it, but I think it is a good alternative to setting up a separate bulletin board.

How about a Wave among private music teachers? A while ago I set up a public Wave, but the way the public waves are listed in the inbox, it was getting buried among many other similar waves. I'm hoping that having a public wave embedded here in my blog post will make it more convenient to use. Maybe? Let's find out. I've added the code to embed a wave below my text, but if nothing appears I'll try again. It doesn't show up in the preview pane.

Please join the wave and add comments there if you can. I have several invitations left if you are not using Wave yet. Leave me a comment below the post if you'd like. Now I'm off to get ready for my four hours of piano lessons . . .


Wednesday, October 7, 2009

As promised, if not a bit late...

This is a series of photographs my husband took while Sally Phillips and I cleaned the action. Sally also shaved the hammer felts and made various adjustments after the action was back in the piano.

It is amazing to hear what a difference correct placement of the action within the piano case can make. There is quite a bit of leeway left to right, and the right-hand end block can be adjusted to hold the action in the correct spot. We found that by moving the action over slightly, the sound was really improved across the whole gamut.

The polished capstans and cleaned key pins made a noticeable difference in the piano's touch, and the shaved hammers resulted in a beautiful tone -- as far as 40-year-old strings will allow, of course! New strings will have to wait a few years.

Here are some photographs with explanations. Click on a picture to view it in full resolution. Enjoy!


We carried the piano action into the dining room and set it up on the table. The workspace was just right. In this picture, Sally was polishing capstan surfaces to remove burrs.
Disassembled action on the table

See how shiny those brass capstans look after they are polished? The action feels so much faster now.
Keys after polishing the capstans

These keys were waiting on deck for their "spa treatment."
Keys with unpolished capstans

The back ends of the keys, with the red felt backstops that "catch" the hammers.
Red felt backstops

Hammer felts after they've been shaved... look closely at the penciled-in numbers.
Row of hammers

More keys to clean...

The piano looks very odd without its "teeth."
Pretty self-explanatory...

Here we are cleaning the key pins. We also put a small amount of lubricant on each pin to further reduce friction in the keys.
cleaning the pins the keys rest upon

Here I am cleaning pins (nice part, Adrienne).
Adrienne cleaning pins

We carefully vacuumed the felt and the entire area surrounding the keys.
Carefully vacuuming the felt

We replaced keys as we cleaned, checking the numbers engraved in the wood, and penciling them in so they would be easier to read. Each key is at a slightly different angle, so it is crucial to put them back in the correct order.
Replacing the keys as we cleaned

Here, Sally is reattaching the hammer mechanism to the key action. I was not really being very helpful, but she had everything under control.
Sally reattaching the hammer mechanism

The action fully reassembled and ready to place back into the piano case.
Reassembled action

More freshly shaved hammer felts.
Freshly shaved hammer felts

Sally checks the placement of the action and makes several small adjustments before replacing the keyslip, fallboard, and end blocks.
Checking the placement